
Information and Orders: 1-406-259-9004
Hours: Mon - Sat 10-6 MST
Central Hobbies
1401 Central Avenue
Billings, MT 59102
We Gladly Accept:

as well as
INSTRUCTIONAL : MK / CHS CONTROL HORN INSTALLATION
This section on building tips sponsored by
CENTRAL HOBBIES
MK Control Horn Installation
by Eric Hawkinson.
If you are not familiar with the MK horns, they are the tapered aluminum horns that are most favored due to their resistance to fatigue and also the ball-bearing clevis that is available to use with them. I've used these horns and clevises for years and feel that they are the best in terms of reliability and precision as well as being maintenance free.
The basic steps (except for leaving the dowel ends untapered) are also great for installing any type of horn in a very rugged and worry free manner.
Step 1
I used to just insert the short dowel that holds the horn into the control surface. But on a couple of occasions I had slop develop from the dowel compressing the foam and balsa around its perimeter. So now I install all of these dowels into a 1" balsa block with its grain running perpendicular to the surface. I've never had one of these installations loosen up.
Start out by cutting two pieces of 1"x1"x whatever balsa block, long enough to go from top to bottom of the surface plus a bit. Use a fine pen to carefully trace the outline onto the top surface of the elevator (in this example, same for any control surface). Make sure that the FRONT of the block sticks out a bit from the hinge line, 1/16" is fine. Using a scroll saw with the table set at 90 degrees to the blade, with the elevator on the shuck, carefully make the cutout slightly undersize and then sand to a perfect fit.
Step 2
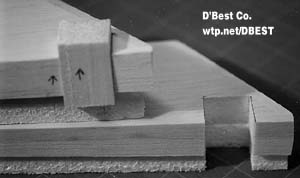
Now fit the balsa blocks, grain vertical, into the cutouts you made. Mark the top and bottoms with a fine felt pen around the 3 sides of the block where they meet the sheeting. Use your scroll saw to cut the blocks almost to the line you marked on each end.
Step 3
Now use a fairly slow epoxy or yellow alphiatic glue to glue the blocks into the surfaces. Make sure that the ends are slightly above the control surface to allow sanding to a perfect fit. Let the glue cure.

Step 4
Take some masking tape and "surround" the block to prevent marring of the control surface. Now use a straight sanding block and coarse paper (80-120) to sand the blocks down to the tape. You'll probably tear up the tape a bit while sanding. Don't forget to sand the front edge also.
Step 5
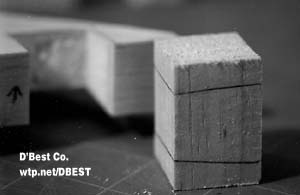
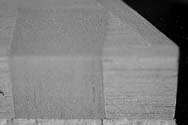
Now remove the tape and use a straight block with finer paper - say 240 or finer - and sand the block smooth to the surface on all three sides. It should be very smooth and flush as in photo number five.
Step 6
Now you need to locate the hole that you'll drill for the dowel. Using the little aluminum "washer" that comes with the MK horns, position it so that the front edge of the washer is set back about 1/8" - 5/32" from the leading edge. This will vary depending on how much taper you'll be sanding into the leading edge of the surface. You want a minimum of 1/16" of balsa left in front of the dowel at the top and bottom after you sand the bevel, but you want the clevis pin as near the hinge line as possible to minimize any differential. With the washer in position, use a center punch to hold it in place while you trace around it with a dark, fine-tipped pen.

Step 7
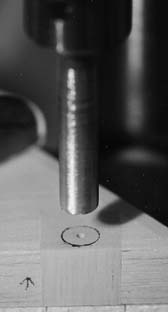
Now we need to make the hole for the dowel. DO NOT use a drill bit for this! And do not drill it by hand. The only acceptable method for best results here is to use a drill press. If you don't have one, get all of your surfaces and dowels ready and then take them somewhere where you can borrow a drill press.
Your "bit" will be a sharpened brass tube. I use 1/2" diameter dowel and thus 1/2" diameter (OD) brass tube. Carefully sharpen the inside edge with a sharp hobby knife, and file an edge on the outside. Cut the length as desired, 4 inches is plenty.
Now chuck the brass tube into the drill press and adjust the table to be perpendicular to the tube. Put the control surface ON THE SHUCK - the leading edge should be vertical to your flat surface. Now very carefully align the brass tube with the circle you marked on the control surface. Look at it from front and side, and make a "shallow" start. If it's not in the right place, move your surface and try again. When you get it right, use light pressure to continue the cut through the entire block.
Step 8
Now you should have a perfectly smooth hole in your block, perfectly vertical and perpendicular to the surface. Admire it for a moment, then proceed to ...

Step 9
Now we need to get those dowels ready to glue in that perfect hole you just drilled. Please note that we will cut the dowels with the ends SQUARE to the length - there is NO bevel. (A big plus, in my mind!)
Cut off several inches of 1/2" dowel and test its fit into the hole in the block. Is should be fairly snug. I've found that it's common for the dowels to be slightly oversized, which is great - just chuck it up in a drill and carefully run it while wrapping fine sandpaper around one side. When the diameter is perfect, unchuck it and place it in the surface. Carefully mark the intersection of the dowel with the top and bottom surface at the REAR side of the dowel. That's the length we'll use. Yes, this means that the FRONT side of the dowel will be slightly recessed into the block. Using a miter box, carefully cut the dowels (at 90 degrees) to the exact length you have marked.
There are two ways to go for drilling the hole you need for the 3mm bolt that attached the horn. I prefer to use my vise with the jaws that hold tubing/rods perfectly vertical. If you don't have one of those, then glue the dowels into the wood blocks now, paying attention to get the ends flush with the rear of the hole. Use good epoxy for this step.
Regardless of whether you glue the horns into the surfaces first or drill them before gluing, you need to mark the position for the hole you'll drill. Again, simply use the aluminum MK washer and center it as perfectly as possible on the end of the dowel. Now use a center locater of some kind (Great Planes sells a fine one for under $10) to start/mark the hole location. Again using the drill press, drill the hole for the 3mm bolt. If you are doing this after gluing the dowel in, be sure to use the shuck again to ensure that the hole is drilled vertically!
Step 10
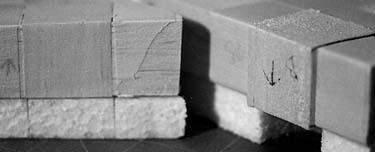
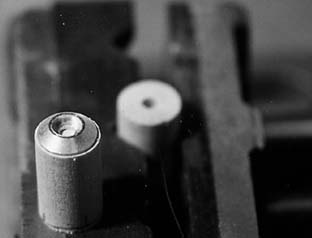
If you haven't already, glue the dowels into the wood blocks now, paying attention to get the ends flush with the rear of the hole. You should have a part that looks like photo number 10.
Step 11
The only gripe I have about the MK horns is that the bolts provided are NOT of any use for any pattern plane I've seen - they simply are not long enough to go through the surface. So order up some 3mm x 30mm bolts and custom cut them for the length of the surface you are building. You want as much thread as possible going into the horn portion of the horn without bottoming out. Order a few 3mm nuts too, and put a nut on the bolt before you cut it - this way after you cut and file the bolt you'll make some "sorta threads" when you remove the nut, allowing the bolt to start into the horn without cross-threading.
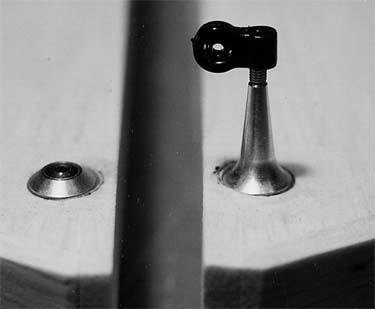
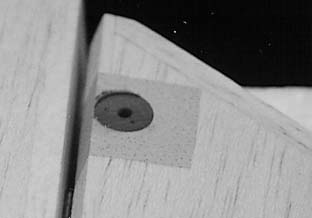
Photo 11 shows the final installation from both sides, before beveling the leading edges. After the plane is painted, the horns will be re-installed using some loctite and that will most likely be the last maintenance they ever need. If you are not glassing and painting, then before covering use THIN foam-safe CA to seal the balsa, letting it penetrate into the ends of the block (top and bottom) thoroughly. If you glass and paint, just give a good coat of thinned epoxy finishing resin to those ends and it will soak in and harden the block nicely.
.jpg)
Sorry, there are currently no products to display in this category.